Automate code tasks with Husky and Git Hooks 🚀
Victor Aiyeola / May 25, 2021
6 min read • ––– views
Automation is awesome. Software serves this purpose and as software developers, automating our workflows is a no-brainer. From checking syntax issues to formatting and linting, a plethora of tools exists that can make this experience seamless. Using Husky + Git Hooks 🚀 can help enforce commit conventions, formatting style, and many more.
Prerequisites
- Familiarity with Git and its commands
- Any repository that runs with Node.js including ReactJS, Angular e.t.c
Let's dive in!
What is Git Hooks?
Git Hooks are custom scripts that fire at certain events in the git lifecycle. These events include different stages of a commit, like before a commit (pre-commit) and after a commit (post-commit). There are two groups of these hooks: client-side and server-side. Client-side hooks are triggered by operations such as committing and merging, while server-side hooks run on network operations such as receiving pushed commits. You can use these hooks for all sorts of reasons. Check them out.
What is Husky?
Yea Husky, not the dog breed 🐶. Husky is a tool that allows us to hook into git hooks pun intended and run specific scripts we want at any stage of the git lifecycle. Husky supports all Git Hooks.
Oh finally, before we continue, we're going to be automating commit linting, so let's get up to speed about conventional commits.
Conventional Commits is a specification for adding human and machine-readable meaning to commit messages. A set of rules for writing good and standard commit messages. That's something you want to be checked in a project that has a team of developers contributing to its source code.
What are we going to build?
We're going to set up a simple project to test the power of Husky in automating tasks by hooking into Git Hooks 😎.
While you can follow along with any project that you're working on, I'll be using Next.js as the starting point for this project, simply for the fact that we can run a single command to get a project started.
We're going to automate formatting our code with Prettier and linting commit messages with commitlint.
Setup project
Next.js is overkill for this demo, but the goal is to minimize the steps for getting set up and also because I love Next.js. It's just one line of command to set up a nextjs project.
To get started with Next.js, navigate to the directory you want to start your project in and run the following:
yarn create next-app new-husky-project
# or
npx create-next-app new-husky-project
Install dependencies
Install the dependencies, since they are all development dependencies, we'll install them with the '-D' flag like so:
yarn add -D husky prettier pretty-quick @commitlint/config-conventional @commitlint/cli
Initializing configuration files
Then, we initialize the configuration files for the dependencies.
Prettier
First, we configure Prettier with some formatting rules. In the root directory create two files
.prettierrc
and .prettierignore
# .prettierrc

{
  "semi": true,
  "singleQuote": true,
  "trailingComma": "all",
  "tabWidth": 2
}
# .prettierignore

/dist
/coverage

# include any folder you want prettier to ignore formatting for
Yea, don't forget to create a format script in your package.json like so
// package.json

{
  "name": "new-husky-project",
  "version": "0.0.0",
  "scripts": {
    "format": "pretty-quick --staged"
    // ...
  }
  // ...
}
pretty-quick runs Prettier on your staged files and will respect your .prettierrc and .prettierignore config files.
The last step I'll recommend is to install Prettier extension on VS Code. Open "Quick Open" (CMD/CTRL + P), paste the following command, and press enter.
ext install esbenp.prettier-vscode
Awesome work, We're going to have some magic soon.
commitlint
To configure commitlint, just run this command and it's done.
echo "module.exports = {extends:['@commitlint/config-conventional']}" > commitlint.config.js
As a final step for configuring commitlint, I recommend installing the Conventional Commits official plugin in your VS Code. It will help you to write structured commit messages through a step-by-step form without having to memorize all the rules.
Open "Quick Open" (CMD/CTRL + P), paste the following command, and press enter.
ext install vivaxy.vscode-conventional-commits
Husky
Run the command,
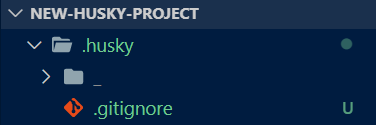
npx husky install
This will generate a new folder in the root directory as below:
To ensure that husky is going to be initialized each time that you install your project, you can add the following postinstall script to your package.json file.
// package.json

{
  "name": "new-husky-project",
  "version": "0.0.0",
  "scripts": {
    "postinstall": "husky install"
    // ...
  }
  // ...
}
Setup Git Hooks 🚀
Phew! 💨 you've made it this far, next step is to tell Husky which scripts we want to execute at which Git Hook action in the lifecycle.
Let's Hook into two, the
pre-commit
and commit-msg
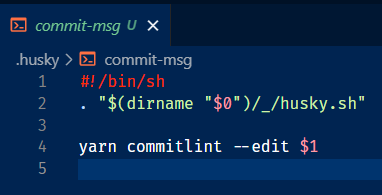
hook. The pre-commit hook fires when you initialize a commit and the commit-msg hook fires after creating a commit message. Run the following commands to tell Husky what to do.yarn husky set .husky/pre-commit "yarn format $1"
yarn husky set .husky/commit-msg 'yarn commitlint --edit $1'
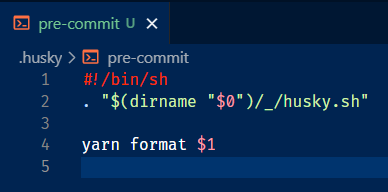
You should see files created in the '.husky' directory
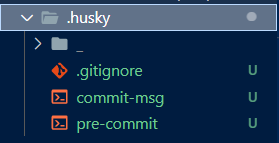
with the following contents for pre-commit and commit-msg hooks respectively
Let's try things out
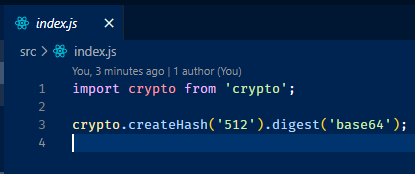
Create an
src
folder, in it, create an index.js
file, let's just write some codeimport crypto from "crypto" crypto.createHash("512").digest("base64")
Notice the double quotes and no semi-colons, the magic is about to happen 🥁.
Save your files, stage all files and make a commit
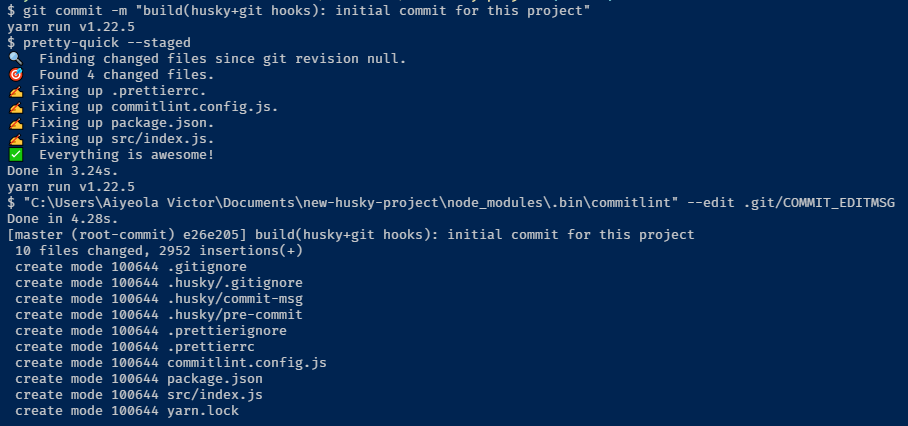
Viola... Just by making a commit, prettier does its job on staged files and the commit message is linted by commitlint, meaning we followed the conventional commits rules for the writing of commit message. World-class isn't it 🌍.
Check out the index file created earlier you should notice it's been formatted 🤯.
Conclusion
This is just awesome stuff. You have endless possibilities for automating your workflows with Husky + Git Hooks 🚀. I hope you enjoyed this article, the source code for this walkthrough is available on GitHub.
Don't hesitate to contact me if you have any questions, leave a comment or send a DM via Twitter @victor_aiyeola. Thank you.
Subscribe to the newsletter
Get emails from me about web development, techie stuff, and latest articles.